mouth-tingling lamb riblets

 
mouth tingling lamb riblets.JPG

Ingredients:

 1 kg lamb riblets, cut into individual pieces

6 t Sichuan peppercorns

2 t coriander seeds

2 t fennel seeds

1 t dried chilli flakes

1 t sea salt

2 T light soy sauce

4 T Chinkiang vinegar

4 t brown sugar

1 T grape seed oil

2 shallots, sliced, optional


Method:

Steam lamb riblets for 45 mins or until tender, topping up simmering water if needed.

Place Sichuan peppercorns, coriander seeds, fennel seeds, chilli flakes and sea salt in a mortar and pestle and crush to combine. Set aside.

Place brown sugar, vinegar and soy sauce in a small bowl and mix until sugar has dissolved. Set aside.

Heat oil in a wok until smoking. Cook ribs in 2-3 batches for 2-3 mins until golden. Set aside. Add spices to wok and toss until fragrant. Return ribs to wok and toss to combine well with spices. Add vinegar mixture, coat ribs and cook for 1 minute. Serve hot with rice and top with shallots.

Serves 4.

Click here for printer friendly recipe.

Back to TOP.

broccolini orecchiette with fried egg and harissa

 
broccolini orecchiette with fried egg and harissa

I wanted to create a more exciting pasta experience and here it is. The silkiness of the slow fried egg goes so well with the creaminess of the pecorino and the harissa's fragrant spiciness just gives it that added kick. Yumbo!

Ingredients:

1 bunch broccolini, trimmed, stalks cut into ½ cm pieces and the florets into 2 cm lengths

1 large onion, chopped

2 garlic cloves, crushed

¼ c pine nuts, toasted

1/3 c frozen peas

¾ c grated pecorino cheese

olive oil

1 T lemon juice

250 g orecchiette

2-4 eggs

sea salt

freshly cracked black pepper

harissa paste


Method:

 In a large pot, bring to a boil 3 L of water with 2 t of salt. Keep hot and ready for the vegetables and pasta.

 Heat 5 T olive oil in a large non-stick pan over medium-low heat for 5 mins. Add the onions and cook for 6 minutes, stirring occasionally, until onions are soft. Add garlic and pine nuts and cook for a further 5 minutes. At this stage, the onion mixture should be soft, sweet and sticky. Season with salt and pepper and set aside.

Add frozen peas and broccolini to pot of boiling water and cook for 2 mins. Fish out vegetables with a wire mesh or strainer and then transfer to a bowl. Pour cold water over vegetables, soak for a few seconds then drain and set aside. Add orecchiette to boiling water and cook according to your liking or packet instructions.

While the pasta is cooking, heat some oil in a frying pan over low heat. Break an egg into the pan one at a time. Cook until done to your liking. I used low heat for the eggs to give it a very soft texture that goes really well with silkiness of the rest of the ingredients.

Drain pasta and add to onion mixture along with the peas and broccolini. Add the cheese and lemon juice and mix well. Season to taste.

To serve, you can divide the pasta into 4 entrée-sized meals or 2 main-sized meals. Top each pasta plate with an egg and place a small dollop of harissa on the side.

Click here for printer friendly recipe.

Back to TOP.

Dan Hong's prawn toast

 
Dan Hong's prawn toast

Dan Hong's prawn toast

Don't be daunted by the list of ingredients and steps for this recipe. Each step doesn't take long to complete and it ended up being quite a simple recipe to execute in the end. I cheated with the yuzu mayo though and I used red cabbage instead of mint leaves to give the dish more colour.

When I saw the recipe used both nuoc cham and yuzu mayo I considered foregoing one of them because I thought there might be too many flavours going on. I'm glad I didn't because the nuoc cham seasons the herb salad delicately.  The freshness of the salad marries perfectly with savoury crunchiness of the prawn toast and the yuzu mayo adds that unexpected pop of flavour. Genius!

Ingredients:

1 large sourdough loaf

sesame seeds for sprinkling

vegetable oil for deep frying

Prawn mousse

600 g uncooked prawn meat

1 egg white

1 T sesame oil

3 t caster sugar

2 t fine salt

2 T thinly sliced coriander stems 

Yuzu mayonnaise (my cheat’s version)

1/3 c Japanese mayonnaise

yuzu juice to taste


Nuoc cham

70 g sugar

70 ml white vinegar

70 ml fish sauce

3½ t lime juice

Herb salad

1 small handful of coriander leaves

1 small handful of round mint leaves

1 small handful of Vietnamese mint leaves

2 spring onions, thinly sliced

Method:

For prawn mousse, put ingredients in a food processor and pulse to a coarse paste. Resist the urge to make it too smooth because you want texture. Refrigerate for at least 2 hours to firm up.

For yuzu mayo, whisk ingredients together adding yuzu juice to taste. Set aside.

For the nuoc cham, whisk together ingredients and 70ml water until the sugar has dissolved. This sauce can be kept in a sterilised jar in the fridge for up to 3 weeks.

To prepare the prawn toast, cut the ends off the bread and slice it into 8mm slices. Spread the prawn mousse in a 1cm layer on the slices with a butter knife. Sprinkle with sesame seeds.

Fill a heavy-based saucepan to a third full with oil and heat to 180C or until a cube of bread dropped into the oil turns golden in 15 seconds. Fry each piece of toast separately until golden and prawn mousse is cooked (3-5 minutes). Check if the mousse is fully cooked. If not, deep-fry the toast for another minute or two. Drain on paper towels, then cut each toast into 4-5 slices.

For herb salad, mix the herbs and spring onions in a bowl, then dress with 2½ tbsp nuoc cham (reserve remainder for another use).

To serve, top each piece of toast with yuzu mayonnaise and garnish with fresh herb salad.

Serves 6 as a snack.

Click here for printer friendly recipe.

Back to TOP.


Italian apple cake


Ingredients:

3 apples

1 ½ c flour

2 t baking powder

¼ t fine salt

3 large eggs

1 c sugar

1 t vanilla extract

½ c Greek yoghurt

½ c sunflower, vegetable or grape seed oil, plus more for greasing

icing sugar for dusting


Method:

Preheat oven to 190°C. Grease a 20-cm springform cake tin with a little oil. Line the bottom of the pan with baking paper and lightly oil the paper.

Place flour, baking powder and salt in a large bowl and whisk together. In a separate bowl, add oil, egg, yoghurt, sugar and almond extract and beat with a mixer to combine well. Peel, core and quarter your apples then cut crosswise into thin slices with a mandolin. Most recipes add lemon juice to the apples to prevent them from browning but I find using lemon juice overpowers the apples in this recipe. To prevent the apples from browning, I don’t peel and slice the apples until this stage, when both the flour mixture and wet ingredients are ready.

Add the wet ingredients to the flour mixture whisk until just combined. Gently fold in the apples. Pour batter into cake tin.

Bake for 40-45 mins or until the top is golden brown and a skewer inserted in the centre of the cake comes out clean. Cool on a wire rack for 20 mins. After 20 mins, loosen the sides of the cake from the tin with a knife and remove the springform ring. Continue to cool the cake until it gets to room temperature. Invert cake onto a plate and remove baking paper. Re-invert onto a serving patter then dust with icing sugar.

Serves 6-8.

Click here for printer friendly recipe.

Back to TOP.


crispy skin salmon and quinoa salad

 
crispy skin salmon & quinoa salad

This dish was inspired by Lola Berry's recipe in the the latest Nourish magazine. She makes healthy dishes look so appetising! I just added my own twist to it to give it more flavour. 

Ingredients:

 2 x 200 g salmon fillets, skin on

1 c quinoa

1 ½ c chopped kale

2/3 c chopped broccoli

2/3 c small cubes of butternut pumpkin

1 lemon, zest and juice

1 t white miso paste

1 t sesame oil

sea salt and black pepper to taste

2 T extra virgin olive oil

1 T vegetable oil


Method:

Take salmon out of the fridge 30 mins before cooking to bring it to room temperature.

Heat oven to 220°C. Toss pumpkin cubes in 1 T olive oil and a pinch of salt. Spread out on a foil-lined baking tray and roast until golden brown, about 25-30 mins.  Remove from oven and set aside.

Place quinoa in a mesh strainer and rinse. Set aside.

In a small bowl, make the dressing by whisking together 1 T olive oil, sesame oil, miso paste, lemon juice, zest and salt and pepper to taste. Set aside.

Place 2 cups of water in a medium-sized sauce pan and bring to the boil. Add 1 T olive oil and stir in quinoa. Turn heat down to low and cover and simmer for 15 mins. Add kale and broccoli and cook uncovered until quinoa is cooked, about 5 mins.  The quinoa is done when the kernels look like they’ve popped open. Remove from heat and allow to rest so that all the liquid gets absorbed.

Heat 1 T vegetable oil fry pan to medium-high heat. Fry salmon fillets skin side down for about 4-6 mins, depending on how you want your salmon done. Turn over and cook for a further 2-4 mins. I also like searing the sides of the salmon for about 30 secs on each side so you get a nice golden brown colour all around. Transfer to a plate and rest for 3 mins.

Add pumpkin to quinoa mixture and toss with dressing. Place some quinoa salad on a plate and top with the salad. Enjoy!

Serves 2.

Click here for printer friendly recipe.

Back to TOP.

yakisoba

 
yakisoba

Get your chopsticks ready, this is one of those dishes that you will make again and again. Once you've got the sauces and noodles in your pantry, this dish doesn't take long to whip up. You can go veggo by omitting the meat altogether. Or, you can get creative by using bacon or pancetta instead of pork belly. Enjoy!

Ingredients:

300 g chicken breast or pork belly, sliced very thinly, about .25 cm thick

1/8 green cabbage, cut into 2 cm pieces

1 onion, cut into .5 cm slices

2 shallots (green spring onions), cut into 4 cm batons

4 x 150 g pre-cooked yakisoba noodles*

5 T tonkatsu sauce*

2 T oyster sauce

1 t fish sauce

4 T vegetable oil

fried eggs, optional

aonori* (dried seaweed flakes) and shichimi* (Japanese 7-spice chilli powder) , optional


Method:

In a small bowl, create the yakisoba sauce by whisking together the tonkatsu sauce, oyster sauce and fish sauce. Set aside.

Take out noodles from their packets and place in a large bowl. Loosen up the noodle strands with your fingers so that they will mix well with the other ingredients. Set aside.

Prepare your vegetables and meat before you start cooking.

Place 1-2 T vegetable oil into a wok and make sure the entire surface of the wok is coated with oil. Heat to medium-high. Fry the meat until it’s no longer pink. Add the onions and cook until translucent. Add cabbage and shallots and stir-fry for another minute. Transfer cabbage mixture into a bowl and set aside.

Clean the wok and add 2 T of oil. Heat to medium-high. Add the noodles and cook for about 2 minutes, stirring well so the noodles don’t stick to the wok. Add the meat and cabbage mixture and yakisoba sauce and mix well, about 1 minute. Serve by topping with fried eggs, aonori and sichimi, if desired.

Serves 4.

*For the noodles, I used Miyakoichi Mushi Yakisoba. They’ve already been steamed and coated with oil. Alternatively, you can use 250g of dried ramen noodles and cook them yourself. Aonori, shichimi and the noodles are all available at Tokyo Mart in Northbridge.

Click here for printer friendly recipe.

Back to TOP.

beef and bitter melon stirfry

 
beef & bitter melon stirfry

I thought I became officially old 3 years ago. Well, my signs of ageing have just reached new botox-necessitating heights. I am not only eating but cooking and posting a recipe containing bitter melon. My young self would've just gagged and called my now aged self a traitor for going anywhere near this green reptilian-looking gourd. Mr B and I were smacking our lips last night over this dish. What is going on?

Ingredients:

300 g sirloin or eye fillet steak, fat trimmed and cut against the grain into .5 cm slices or thinner if you like

1.5 c sliced bitter melon, discard seeds and scrape out white flesh inside when preparing, slice thinly at a 45-degree angle

2 t chopped garlic

¼ c chicken stock

1 T salt

vegetable oil for frying

beef marinade:

1 t oyster sauce

1 t shaoxing wine

1 t sugar

2 t light soy sauce

1.5 t cornstarch


sauce:

2 t dark soy sauce

2 T light soy sauce

1 t sesame oil

1/8 t white pepper

3 T xaoxing wine

3 T oyster sauce

2 t sugar

1 T cornflour dissolved in 3 T water

Method:

Combine marinade ingredients in a bowl whisk till sugar and cornstarch have dissolved. Add beef and toss well. Marinate for at least 20 mins.

Boil a medium-sized pot of water and add 1 T salt. Blanche bitter melon for 45 seconds then drain immediately.

Place all sauce ingredients in a small bowl and mix well. Set aside.

Add 1 T of vegetable oil in a wok and heat until smoking. Add half of the beef and stirring quickly for 45 seconds making sure all sides are browned. Remove immediately from the wok and transfer to a bowl. Repeat the same for the rest of the beef.

Reduce heat to medium high so the garlic doesn't burn. Give the wok time to cool down a bit, about 1 minute. Add 1 T vegetable oil then add garlic. Fry till fragrant, about 20 seconds. Add bitter melon and keep stirring for 10 seconds. Add sauce and stock and stir until the sauce bubbles, about 5 seconds. Add beef and mix everything well. Cook for a further minute. Add some of the cornflour and water mixture and thicken sauce to your liking. Serve immediately.

Serves 4 part of a banquet.

Click here for printer friendly recipe.

Back to TOP.

cabbage torta

 
cabbage torta

One of my favourite Filipino home-cooked dishes is "torta". I love it because it's simple but really satisfies. Most of the ingredients are probably already in your kitchen right now.  The best way I can describe it is it's a cross between an omelette and a fritter. It's like an omelette because it's made up of eggs with some kind of filling be it beef, pork or crab, but it's often fried for a lot longer until it browns like a fritter.

Last December, I was invited over for dinner at a friend's place and came across my first cabbage torta. I loved it and got all excited because I happen to think cabbage is another one of those underrated vegetables.

This recipe is my version of cabbage torta. I cooked down the onions and cabbage and didn't add any water so that they would be caramelised instead of stir-fried. I also added a bit cornstarch to help the torta hold its shape. Although I chose to eat it with Japanese mayo and tonkatsu sauce, the flavours of this torta are nothing like an okonomiyaki, a Japanese pancake made of cabbage. With an okonomiyaki, the raw cabbage is cooked in the pancake and doesn't caramelise.


Ingredients:

1/3 of whole cabbage, sliced into bite-sized pieces

1.5 red onions, sliced

3 shallots, cut into 5 cm lengths

2 eggs, beaten lightly

1 c plain flour

1 c water

sea salt

cracked black pepper

optional: Japanese mayo and tonkatsu sauce

Vegetable oil for frying

Method:

Heat about 2 T oil in a fry pan over medium high heat. Fry onions until they become translucent. Add cabbage in batches so that the pan doesn’t cool too much and lead to stewing. Once all the cabbage is in, reduce heat to medium. Cook down the cabbage and onion mixture until the flavours deepen and become sweet, about 10-15 mins.  Season generously with salt as this really brings out the flavours. Add shallots and cook for about 30 seconds. Remove from heat and transfer to a bowl. Allow to cool.

Combine eggs, flour and water. Season to taste. When the vegetable mixture has cooled enough, add in the batter and mix well.

Place enough oil in a fry pan to cover the entire base of the pan and heat over medium high heat. Measure out ¼ c of the cabbage mixture into the fry pan. Flatten fritter with a spatula. Fry on both sides until golden brown.

Optional: serve with Japanese mayo and tonkatsu sauce.

Serves 4-6.

Click here for printer friendly recipe.

Back to TOP.

Aussie Christmas Trifle


Aussie Christmas Trifle

Here's the perfect trifle for your hot Aussie Christmas. The mangoes and strawberries are refreshing and oh-so satisfying mixed with custard, cream and sponge. The only danger is it goes down so easily you end up eating multiple servings!  I made this for my husband's family this weekend and they all loved it. 

Ingredients:

450 g madeira cake, cut into 3 x 5 x 2 cm rectangles

1 kg thick custard, this tastes way better than the ones you make out of a packet

1 large punnet strawberries, hulled and sliced, leaving a few pieces with leaves intact for garnishing

3 large ripe mangoes, cut into cubes

2 packets strawberry jelly crystals (I prefer using the lite jelly as it has less sugar)

1 packet lite mango and passionfruit jelly crystals

1/4 c creme de cassis (blackcurrant liqueur), optional

400 ml thickened cream, whipped till you get soft peaks

Method:

Make 1 day ahead or night before so that the flavours have time to infuse.

Make strawberry jelly according to packet instructions minus 50 ml of water for a firmer texture. Allow to cool before pouring over the strawberries. 

Arrange the pieces of madeira cake on the bottom of a large glass bowl. Scatter strawberries over the cake then sprinkle with creme de cassis. Pour the cooled jelly over and place in the fridge to set. I waited for about 45 mins.

Make mango and passionfruit jelly according to instructions minus 50 ml of water. Allow to cool while you prepare the custard and mangoes.

Pour 3/4 of the custard over the strawberries and spread evenly. Cut up the mangoes and spread over the custard. Pour mango and passionfruit jelly over the mangoes. Place in the fruit and allow to set overnight.

Just before serving, place remaining custard over the mango jelly then the whipped cream. Top with strawberries.

Serves 15 people.

Click here for printer friendly recipe.

Back to TOP.

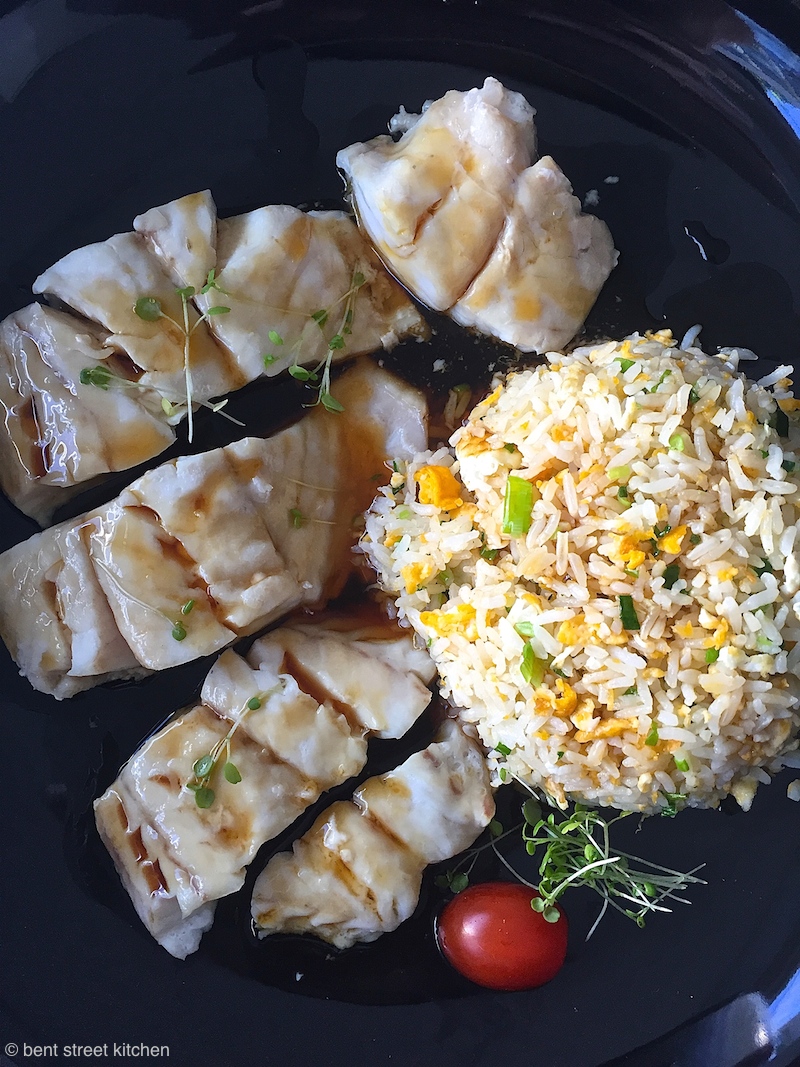
Dan Hong's steamed fish with egg fried rice and shiro dashi sauce

 
Dan Hong's steamed fish with egg fried rice and shiro dashi sauce

Ingredients:

6 x 150 g pieces of hapuku fillet, skin off, pin-boned, or other mild-flavoured fish like snapper or grouper

3 eggs

3/4 c uncooked short grain rice

1 t chicken powder

1 sea salt flakes

1 t caster sugar

1/4 t ground white pepper

3 shallots or spring onions, finely chopped

1/2 lemon

1/3 vegetable oil

coriander leaves for garnish

shiro dashi sauce:

1/3 c shiro dashi*

4.5 T light soy sauce

3.5 T sugar syrup (Bring 3 T caster sugar and 3 T water to a boil in small sauce pan then simmer gently until it thickens slightly, about 5 mins.)

7 T water

1 T kuzu root starch*


Method:

Cook 3/4 c rice a day ahead if possible.

Make shiro dashi sauce by combining dashi, soy sauce, sugar syrup and water in a small saucepan and bring to the boil. Combine kuzu root starch with just enough water to make a paste, about 1-2 T. Only add kuzu paste when dashi comes to the boil. Add the paste a little at a time, whisking constantly, until the sauce coats the back of a spoon. Set aside.

Steam fish in a steamer or work for about 6-7 mins, depending on thickness, until a thin skewer can be inserted easily.

Heat a large wok over high heat. Add oil and when it starts to smoke, add eggs and cook for about 35 seconds, moving them around. Add rice and stir-fry until heated through and no clumps of rice remain. Add chicken powder, salt, sugar, pepper and shallots. 

Plate rice with the fish. Reheat shiro dashi sauce, stir in lemon juice (to taste) and spoon over fish. Garnish with coriander leaves.

Serves 6.

Click here for printer friendly recipe.

Back to TOP.

*You can buy kuzu (arrowroot) starch and shiro dashi from Japanese groceries.

*You can buy kuzu (arrowroot) starch and shiro dashi from Japanese groceries.

Tetsuya's five-spice quail

 
Tetsuya's five spice quail

I've been planning a Japanese tapas menu for an upcoming dinner for friends and it led me to revisit an old favourite. Tetsuya Wakuda is my first culinary hero in Australia. I became an instant fan with my first mouthful of food at his first restaurant in Rozelle, so modest from the outside we couldn't even work out where the front door was. I swear it wasn't until after I tasted his cooking that I officially became a foodie. It was as if his Confit of Ocean of Trout made me start speaking in tongues. After another bite, I began to wax lyrical, telling people that it was as if I was tasting poetry in my mouth. It really was.

His cookbook Tetsuya is still a prized possession. My husband (then boyfriend) went to see Tetsuya at his restaurant asking for the book to be signed when chefs still weren't considered as the huge celebrities as they are now. I believe my partner's words that made it happen were, "you're like a rock god to Frances."

This recipe is simple to make and now that quail is more readily available it's something you're bound to make time and time again.


Ingredients:

400 g butterflied quail, separating the legs from the breast section, creating 4 pieces per quail

1/2 t finely chopped garlic

sea salt and ground white pepper

2 pinches caster sugar

2-3 pinches five spice powder

1 drop sesame oil

1 drop light soy sauce

1/2 t mirin

200 ml grapeseed oil for frying

julienned ginger and shallots (scallions) for garnishing

Method:

Have all your ingredients ready by your wok.

Heat oil in wok over medium high heat. If you put in a wooden chopstick or spatula and the oil bubbles around it then the oil is ready.  Add half of the quail and garlic and cook for 3-4 minutes on each side until tender and cooked through. Drain on kitchen paper. Remove any remaining garlic from the oil. Repeat process for remaining quail and garlic. Discard oil.

Return quail to the wok and dry toss with salt and pepper to taste. Add sugar, five-spice powder, sesame oil, soy sauce and mirin to taste. Toss well making sure all the flavours are well combined. Transfer to a serving plate and garnish with ginger and shallots.

Serves 4.

Click here for printer friendly recipe.


strawberry chiffon cake


Strawberries and cream. And cake. It's hard to say no this classic and winning combination of flavours. Maybe I didn't do a good enough search but I couldn't find a recipe like this one online so I had to draw from different sources to put this cake together. It's pretty labour intensive but the reward is worth it!

Ingredients:

cake

1 and 1/3 c cake flour or in Australia it's biscuit pastry & cake plain flour (it comes in a box and Woolworths stocks the Lighthouse brand); alternatively, you can use self-raising flour and take out the baking powder

1 c caster sugar

1.5 t vanilla extract

2 t baking powder

3/4 t salt

1/2 c and 2 t cold water

5 egg yolks

5 egg whites

1/3 c and 1 t vegetable oil

1/4 t cream of tartar

Method:

Preheat oven to 165 °C. 

Line the bottom of a square 20 x 7 cm cake tin with baking paper. Set aside. Do not spray your cake tin with any oil as this will brown your cake.

Sift the flour, sugar, baking powder and salt into a bowl. Stir with a whisk to combine well. Make a well in the middle of the dry ingredients. Add egg yolks, oil, vanilla and water and beat with an electric mixer until light and smooth.

In a separate mixing bowl, beat the egg whites on high speed. Once frothy, add the cream of tartar. Continue beating until soft peaks form.

Fold in the egg white mixture into the batter with a rubber spatula in 3 batches. It's important to use a spatula and a folding motion so as not to deflate the egg whites. It's done when there is no streak of white or yellow and all you have is a uniform pale yellow colour.

Pour batter into prepared tin. Place cake at the lowest oven rack so the top of the cake does not brown too much. Bake for 40-50 mins. The cake is done when a skewer comes out clean when inserted in the middle of the cake.

When cake is done, remove from the oven and place on a wire rack. Cool for 5 mins then run a sharp knife around the edges until the cake can easily slide out of the tin. Place the wire rack on top of the cake then turn the cake over onto the wire rack. Remove the tin and baking paper. Allow to cool completely. Using a long knife, cut the cake in half horizontally.


strawberry syrup

1 c chopped strawberries 

1/2 c caster sugar

1/2 c water

Method:

Place all ingredients in a small saucepan. Heat over medium high heat and bring to the boil. Reduce heat to medium low heat and cook for 20 mins or until the sauce has thickened. Cool then store in the refrigerator until needed. 

You can make this a day head and use the leftovers for toast, scones or milkshakes.

strawberry filling and icing

450 ml thickened cream

45 g icing sugar

2 t gelatine powder

4 T cold water

1 cup finely chopped strawberries (about 140 g)

8-12 strawberries (depending on size), halved lengthwise, to decorate the top of the cake

strawberry syrup

Method:

Brush some strawberry syrup on the two cut sides of the cake.

If you happen to get a batch of sour strawberries, you can sweeten the chopped strawberries by adding 1-2 T of the strawberry syrup.

Beat the thickened cream with an electric mixer until soft peaks form. Add icing sugar and beat until sugar has dissolved.

In a small saucepan, place 4 T of cold water and then sprinkle gelatine powder over it. Let it stand for 5 mins. Place over very low heat, stirring constantly, just until the gelatine dissolves. Remove from heat. Cool until it reaches the temperature of your finger. Do not let it cool past this point or it may solidify.

In a small bowl, place 1 T of the whipped cream and gradually stir in the cooled gelatine until well combined. Replace this mixture back into the bowl of cream. Whip the cream until stiff.

Spread 6-7 T of cream on one of the cake halves. Arrange the chopped strawberries on top. Cover with another 5 T of cream. Sit the other cake half on top, cut side down. Use the remaining cream to cover the top and sides of the cake, working quickly before the gelatine sets.

Place the strawberry halves on top of the cake and drizzle with a bit of strawberry syrup. Place in the refrigerator until ready to serve.

Note: You will need about 3 x 250 g punnets of strawberries for the entire recipe, with some leftover.

Optional: top with rose petals or other edible flowers. Try to get home-grown roses from your own garden or someone else's so you where pesticides haven't been used.

Serves 8-10.

Click here for printer friendly recipe.

steamed artichokes with lemon butter parmesan dip

 
steamed artichokes with lemon butter dip

I had lunch with a friend in Rozelle today and we decided to pop into About Life for their delicious cocoa chai. I always find it hard to resist browsing through the store even if I'm just getting take-away.  The food displays seem to say, "Buy me. I'm organic. I'm good for you." And so that's what I did when I came across a beautiful pile of purple-green artichokes that looked more like something I'd put in a vase instead of on a plate. I've never cooked artichokes before so I decided today was the day.

I love artichokes and the most recent rendition I sampled was the 'carciofli alla giudia' (fried whole artichokes) from the Jewish ghetto in Rome.  I've never had them steamed though so I thought I'd start with the basics and save myself from some deep fried calories.


Ingredients:

2 artichokes, trimmed (see link on how to trim and eat an artichoke)

dip:

2 T melted butter

2 T extra virgin olive oil

1/4 c grated parmesan cheese

1/4 t lemon zest

squeeze of lemon juice, to taste

1 small garlic clove, finely chopped

sea salt and black pepper, to taste

Method:

Steam the artichoke for about 15-20 mins. They are done when you can easily slide a fork into the core. When artichokes are ready, dry them on paper towels. 

Place all dip ingredients into a small bowl and whisk until well combined.

Arrange artichokes on a plate and serve with the dip.

Steamed artichokes are very subtle in flavour so they are best eaten on their own with a nice glass of white wine.

Serves 2-3.

Click here for printer friendly recipe.

Back to TOP.


baked panko pumpkin


Who doesn't love tempura? It's crunchy and melts in your mouth especially when it's freshly cooked. But I've only tried to make it once because I try to steer away from cooking deep-fried food. 

When I saw the photo of Maori Murota's recipe of "baked pumpkin" in her book "Tokyo Cult Recipes", I thought the pumpkin was deep fried and almost skipped past it. After closer inspection, I got excited when I realised it was baked and the pumpkin was seasoned in a way that promised a great combination of texture and flavours.  This baked pumpkin has some the crunch of a tempura thanks to the panko and you don't need to have a dipping sauce because of the honey soy marinade.

In this photo, I've got the baked pumpkin as part of a vegetarian "bento" or Japanese-style lunch.


Ingredients:

16 x .5 cm slices of peeled Kent pumpkin

4 t grape seed oil

4 t light soy sauce

4 t honey

4 pinches of salt

4 T panko (Japanese bread crumbs)

Method:

Preheat the oven to 180°C. Line a shallow oven tray with baking paper.

Mix oil, soy sauce, honey and salt in a bowl that's large enough to toss the pumpkin slices into. Add pumpkin slices, making sure each piece is well coated with the oil mixture. Place the pumpkin slices on the baking tray and sprinkle with panko. Bake for 10 mins, until tender.

Serves 4.

Click here for printer friendly recipe.

Back to TOP.

Japanese chicken meatballs (tsukune)

 
Japanese chicken meatballs (tsukune) by Bent Street Kitchen

I love Japanese food and can happily eat it everyday.  It's tasty without the flavours being overpowering and satisfying without being too filling.

I've had these chicken meatballs or tsukune at various restaurants but have never tried to make them myself until now.   I've had them grilled on skewers or pan-fried like this recipe. I went with the easier option of pan frying and not having to put them on skewers. I got the original recipe from Maori Murota's "Tokyo Cult Recipes" but adjusted it.

These tsukune are great paired with a side of Japanese pasta salad and a cold glass of chardonnay. Nyum!

Ingredients:

500 g chicken mince

1 thumb-size piece of ginger, peeled and grated

2 shallots, finely chopped 

1 T and 1 t soy sauce

1 T and 1 t mirin


2 t sesame oil

1 egg

1 t cornflour

grape seed oil, for frying

sauce:

3 T soy sauce

3 T mirin

2 T sugar

2 T oyster sauce

1 garlic clove

Method:

In a small bowl, whisk together sauce ingredients until well combined. Set aside.

Place chicken, ginger and shallots in a large bowl and knead together. Add soy sauce, mirin, sesame oil, egg and cornflour and mix well. To taste test, place half a teaspoon of the mince mixture on a microwave-proof plate and cook on high for 30-45 seconds. Adjust seasoning if needed.

Place about a 1 cm depth of oil in a fry pan that would fit all your meatballs. Heat oil to medium heat. Using a tablespoon, scoop a generous tablespoon of mince and use another tablespoon to push the mince off onto the fry pan.  I shape my mince into patties rather than meatballs to help them cook evenly. Cook until browned on one side. Turn over and leave until cooked through. Remove meatballs from the fry pan and put on a plate. Tip out excess oil from the pan.

Put the sauce into the fry pan and turn up the temperature to medium high heat until the sauce thickens, taking care not to burn the sauce. Replace the meatballs and any juices on the plate and coat meatballs with the sauce. Discard garlic. Serve warm.

Serves 4.

Click here for printer friendly recipe.

Back to TOP.

beef shin ragu

 
beef shin ragu by Bent Street Kitchen

I couldn't let winter slip away without finishing off with a satisfying ragu. Slow cooking beef shin with the bone in gives this ragu such a deliciously rich flavour. Enjoy!

Ingredients:

1.5 kg beef shin, bone in

1 large onion, chopped

3 cloves garlic, crushed

1.5 cups diced carrots

3 celery sticks, diced

3-4 sprigs of rosemary

1 cinnamon stick

2 bay leaves

2 anchovy fillets

2 400g tins of plum tomatoes

3/4 bottle of red wine

1 t sherry vinegar

1/2 - 1 t sugar

Grapeseed oil, for frying


Method:

Preheat oven to 190°C.

Heat oil in oven-proof casserole pan over high heat. Season beef with salt and pepper. Brown beef pieces all over and fry in batches. Remove beef from pan and set aside.

Reduce heat to medium. Add more oil if needed. Fry onion, garlic, carrots, celery and herbs. Cook for about 5 minutes.

Add tomatoes, wine, anchovies and beef and bring to the boil. Cover pan with lid and cook in oven for 3 hours, or until meat breaks easily with a spoon. Add sherry vinegar and sugar. Check seasoning and add salt, pepper and more sherry vinegar and sugar to taste.

Serve with pappardelle pasta, roast or mashed potatoes or steamed long grain rice.

Serves 4-6.

Click here for printer friendly recipe.

beef shin ragu by Bent Street Kitchen

Back to TOP.

Filipino ginataang prawns

 
Filipino ginataang prawns by Bent Street Kitchen

I think Filipino cuisine is quite unique and it gives me pleasure to share one of our tasty dishes today. We do use coconut milk/cream like a lot of other Asian countries but we flavour it differently. My niece Nina is a wonderful chef and I love her "ginataang kuhol" or snails in coconut milk. This is her recipe but I've used prawns and added spinach leaves instead.

Try to avoid using shelled prawns. The head and shell of the prawns, like most shellfish, provide a lot of flavour.

Ingredients:

1 dozen whole prawns, trimmed and deveined, head and shells intact

 1/2 c finely chopped red onions

1 T minced garlic

1/2 c finely diced roma tomatoes

1 thumb-size ginger, julienned

1/8 c fish sauce

1/2 - 1 t sugar, to taste

3/4 can of 400 ml coconut cream

2 handfuls of English spinach leaves, roughly torn into large pieces

2 T vegetable oil

hot green or red chillies, optional and to taste


Method:

Heat oil in a wok to medium high heat. Add garlic and onions and fry for 2 minutes until onions become translucent. Add ginger and fry for 1 minute, until fragrant. Add tomatoes and fry for 2 minutes until the tomatoes have cooked down a bit and the mixture is caramelised.  

Add fish sauce then the prawns. Fry for 1 minute, allowing both sides of the prawns to cook evenly. Add coconut cream and sugar and bring to a simmer. Simmer for 4 minutes. Add the spinach leaves and cook until leaves are wilted, about 1 minute. Remove from heat and serve hot.

Serves 2-3 or 3-4 as part of a banquet.

Click here for printer friendly recipe.

Nina's ginataang kuhol

Nina's ginataang kuhol

Back to TOP.

apple crumble with walnuts and cheese

 
apple crumble with cheese

If you're someone who gets the magic of salty-sweet in desserts then you're in for a treat with this apple crumble recipe. I grew up in Manila with a lot of sweets mixed with cheese like ensaymada (a Filipino brioche like bread topped with butter, sugar and cheese), mamon (a chiffon cupcake that can be topped with cheese), puto (steamed rice cakes) and bibingka (a rice cake traditionally cooked in claypots lined with banana leaves). So when I was experimenting on apple crumble this week, the tasty leap to cheese was not a big one. 

It's not just Filipinos that love to have sweets with cheese. The North Americans also have their beloved apple pie with a slice of cheese. I suspect this mixing of cheese with sweets is probably an extension of the European tradition of having their desserts with cheese. 

It may seem like a strange combination but don't knock it till you've tried it.

Ingredients:

4 medium sized apples, peeled, cored, cut into 1/8 lengthwise segments, then cut each 1/8 segment into 4 crosswise pieces; I use a mix of granny smith, royal gala or jazz apples

1/4 c maple syrup

80 g chilled unsalted butter, cut into cubes

3/4 c plain flour

1 t baking powder

1/2 c brown sugar

1 t ground cinnamon, 1/2 t for the apples and 1/2 t for the crumble

1/4 c chopped walnuts

pinch of fine sea salt

cheddar cheese or any cheese you like, for grating


Method:

Preheat oven to 190 °C. Lightly grease oven-proof pan with a capacity of 1.5 litres. 

Mix apples, cinnamon and maple syrup together then transfer to greased baking dish. 

Place flour, sugar, cinnamon, salt and walnuts into a large bowl and combine well with a whisk.  Add butter and rub it into flour mixture with your finger until it resembles coarse breadcrumbs. Place in freezer for 10 mins or in refrigerator until you're ready to bake.

Sprinkle crumble mixture on top of apples. Do not press down the crumble mixture as this will make your crumble too hard when it cooks. Bake in oven for 40-50 minutes, until crumble is golden, apples are soft and syrup is bubbling through the surface.  Place the dish in the middle rack, making sure it's not too close to the heating element as this can burn the crumble before your apples are cooked.

If you use a deep dish, the crumble can end up browning before your apples are cooked. In this case, once your crumble is golden brown, cover lightly with aluminium foil until apples are soft.

Grate cheese over crumble just before serving. 

Serves 4-6.

Click here for printer friendly recipe.

apple crumble with cheese by bent street kitchen

Back to TOP.

baked chicken curry

 
baked chicken curry by Bent Street Kitchen

baked chicken curry by Bent Street Kitchen

It's probably dangerous to mess with a classic but I had a really clear vision and taste of how I wanted this dish to be. There are many forms of chicken curry but with this recipe I'm paying homage to food usually found in Hong Kong style cafes.

Hong Kong style cafes were really popular back in the 1980s and they typically served a mix of Hong Kong or Macau style Western food. Menus would typically have cheese and egg sandwiches, thick white toast with condensed milk, baked pork chop on rice, tomato sauce steak with rice, baked seafood in cream sauce served with spaghetti, black coffee with lemon and even a cold glass of Horllcks (yes, the malted milk drink). 

There are some Hong Kong style cafes around Sydney's Chinatown but I haven't been to one in ages. I often go to the cafes in Hong Kong with my family.

When I was creating this dish in my mind, I was thinking of mixing some cooking styles. I wanted a full curry flavour, golden brown chicken skin, waxy roasted potatoes instead of the usual boiled texture you get in curries and caramelised red capsicum that you only get from roasting.

I think this dish is absolutely delicious. I'm so pleased it turned out the way I hoped it would. Of course, now I'm already thinking of stretching the fusion vibe further by adding some cheese and turning it into a curry chicken rice bake. Stay tuned!


Ingredients:

700 g chicken wings, wing tips discarded and excluded from weight, cut in half at the joints

2 medium-sized red delight potatoes, peeled, cut into 4 cm chunks, at a 60 degree angle to maximise surface area and reduce cooking time

1 red capsicum, deseeded, cut into 4 cm squares

1 brown onion, cut lengthwise into 2 cm wide wedges and separated into single pieces

1 long green chilli, optional

4 T light soy sauce

4 T Shaoxing wine

3 T curry powder

2 t sugar

1 cup coconut milk

1 T vegetable oil

Method:

In a large bowl, mix soy sauce, Shaoxing wine, sugar, curry powder until well combined. Add chicken and potatoes and coat with marinade well. Marinate for 1 hour, stirring once or twice to make sure it marinates evenly. I suggest taking it out of the refrigerator, half an hour before you plan to put it in the oven to reduce cooking time.

Preheat oven to 200 °C.

Heat 1 T vegetable oil in a fry pan over medium high heat. Add onions and fry for 1 minute and until the onions are well coated with oil. Set aside. I fry the onions first instead of just adding them raw with the rest of the ingredients because this keeps the onion from stewing instead of caramelising while in the oven.

Place chicken and potatoes into a large baking dish along with green chilli, onions, capsicum and coconut milk. Mix well and spread evenly. Cook for 30 mins then remove from oven and give meat and vegetables a turn so they brown evenly. Return to oven and bake for another 20-30 mins. It is done when the juices run clear from the chicken and you can easily slide a knife into the potatoes. Serve with steamed rice.

Serves 4.

Click here for printer friendly recipe.

Back to TOP.


egg and tomato fried rice

 
egg and tomato fried rice by Bent Street Kitchen

Here's another easy mid-week meal you can throw together this winter.  This is a lightly flavoured fried rice with no meat. It's perfect when you want something satisfying without being too rich or heavy.  It's also a good match for rich-tasting dishes like the eggplant with garlic and vinegar sauce. I added tomatoes to give it that freshness. You can use sliced cucumbers instead but just stir them through at the end instead of cooking them.

Ingredients:

3 c cooked jasmine rice, preferably cooked the day before as freshly cooked rice will tend to clump together

3 eggs


1 t chicken powder

1/2 t sea salt

1/2 t sugar

1-2 t Maggi seasoning

ground white pepper, to taste

2 ripe tomatoes, each cut into 8 lengthwise wedges

2 shallots, sliced finely, using only the bottom half of each stalk

4-6 T vegetable oil

Method:

Heat oil in wok over high heat. When it starts to smoke, add eggs and fry for 5 seconds. Begin to scramble eggs so that you have some pieces that are just the yolk, white or both. When eggs are cooked 2/3 of the way through, add rice and fry till heated through.

Add chicken powder, salt, sugar, Maggi seasoning and white pepper to taste.  Add shallots and tomatoes and cook until tomatoes begin to get a little soggy. Check seasoning and add more salt or Maggi, if you like. Remove from heat.

Serves 2-3 people. 

Note: Chicken powder is available from Asian food stores. You can use Vegeta stock powder as a substitute.

Click here for printer friendly recipe.

Back to TOP.